The Email Invalid field in Marketo is used to identify records when the lead is created and the email format is not correct, or when the email is a hard bounce that receives a 5## bounce code signaling that the email is no longer valid i.e. the email address does not exist. It’s important to know that the 500 bounce code reasons are generated by the company, so the 500 range number will match, but the reasons can vary.
>> Related: How to Update the Default Marketo Unsubscribe Landing Page <<
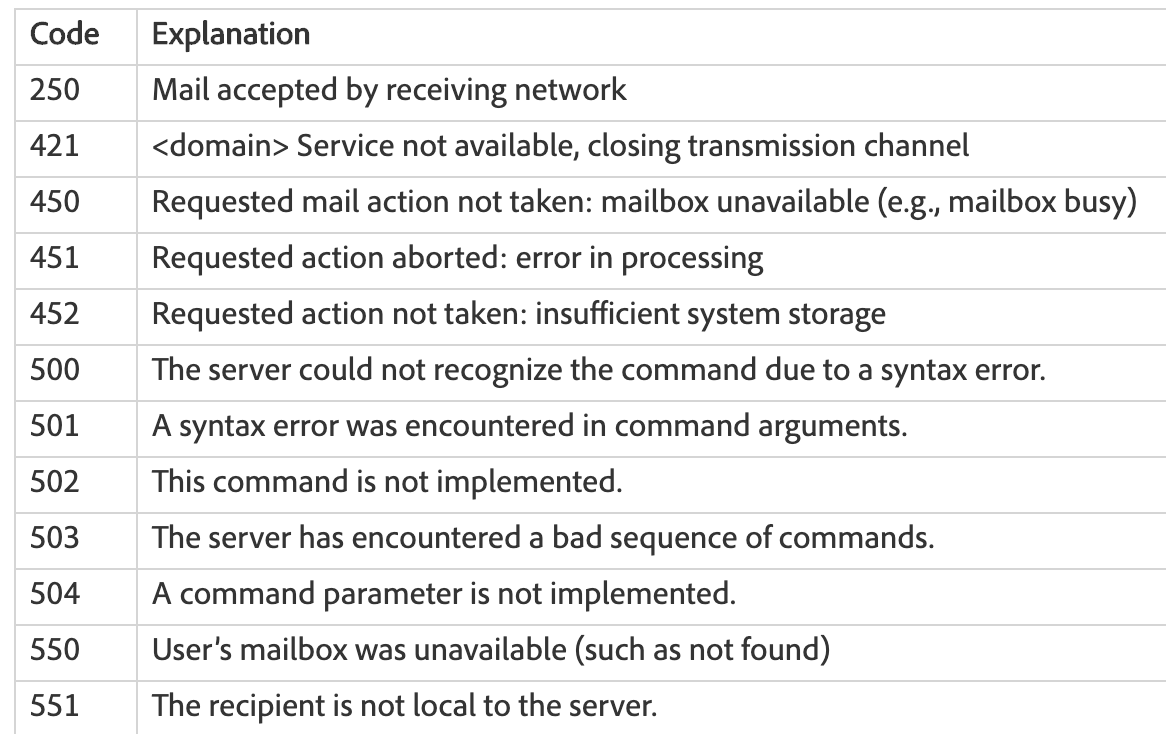
Here are some general hard bounce codes that would trigger Marketo to populate a ‘True’ value in the Email Invalid field:

To see other high-level bounce reasons, Kenneth Law wrote a good summary in the Marketo Community here. The bounce reasons also populate the Email Invalid Cause field in Marketo, which can be used to further analyze the types of hard bounces unique to your email deliverability instance.
In this post:
What should I do with the Email Invalid field?
There are a few smart campaigns I recommend be built in your operational folder in Marketo to further manage invalid emails. Before I dive into those, let’s walk through the initial Marketo/Salesforce integration as it relates to this field since it’s known to cause issues.
Typically, when integrating Marketo with Salesforce there isn’t a standard SFDC field available to map to Marketo’s out-of-the-box “˜Email Invalid‘ field. The result is the field is left unmapped Marketo.
Fast forward a few months later, your customer service and/or sales reps want a way to identify if an email is bad, and they make a request to their SFDC admin to create a field that will show them if the record’s email is valid… In comes a new field for the Email Invalid use case in Marketo!
The Salesforce custom field code is worded a few different ways, here’s an example of what it could look like: Invalid Email Address_c. The typical “˜band-aid’ I’ve come across is a smart campaign set-up in Marketo that listens for the field change in Salesforce or Marketo. The flow for this smart campaign uses a change data value that updates both fields with the new values – or worse, it auto-updates both fields in a bunch of various campaigns. This gets messy really quick and there is an easier way!
Remapping Marketo’s Email Invalid field
First, it’s worth noting that any time a new field is created in Salesforce that has anything to do with evaluating email data, your Marketo Admin/Marketing Ops person should be involved in the decision. The Marketo Admin should then assist in getting the new custom Salesforce field mapped to the current unmapped Marketo field. Finally, the new Salesforce field should be a read-only field, so the field value is driven by Marketo automation.
If this is a brand new field in Salesforce i.e. no data is populating that field yet, then your Marketo Admin can submit a support ticket, to request a remap of the field. Marketo does this for free, but to help them accomplish this quickly below is exactly how you would ask them in the ticket:
Subject Line: Request a Re-Map of a custom field in salesforce to an existing standard field in Marketo.

Description: Please remap the fields below.

Current Marketo Mapping:
Field name = Email invalid
CRM field Map: Unmapped

CRM field Map: Invalid_Email_Address__c (SFDC Lead) [note* update the name value here with your new SFDC custom field API Name]
Invalid_Email_Address__c (SFDC Contact)

Desired Mapping:
Marketo Field name: Email invalid
SFDC CRM field Map:
Invalid_Email_Address__c (SFDC Lead) [note* update the name value here with your new SFDC custom field API Name]
Invalid_Email_Address__c (SFDC Contact)
Once the mapping is completed by Marketo CS, Email Invalid will now control that field automatically by evaluating hard bounces and badly formatted emails as discussed above, as well as in any additional smart campaigns you have set up in your instance to update the Email Invalid field.
What to do if your Salesforce custom field is populated with data?
If you are reading this and you fall into my “˜band-aid’ smart campaign scenarios outlined above – no worries – you can still re-map and submit a ticket exactly like the example above. But there are a few additional steps to take before you can submit the Marketo support ticket.
Step 1: You’ll need to ensure that you normalize the field data for the Marketo system Email Invalid field. This is because once Marketo remaps the fields the values in your custom SFDC field will match. To do this you would run a batch smart campaign that looks for inconsistent values across the two fields, and the flow updates them to match. Below is an example of how to do this.
Smart List:

Flow:

Step 2: Remove the custom field from all smart campaigns, emails, landing pages or smart lists where it’s referenced. To see where it’s used Go into Admin> Fields> and pull over the custom field. You will see a list of where it’s used. Then one by one remove that field from those places [see, it can be messy!]

Once you’ve removed your custom field from all of the places it’s referenced you are ready to submit your support ticket by following the instructions above. When Marketo completes the remapping, you are ready to set up additional Email Invalid smart campaigns to help manage the field.
Smart Campaigns to manage the Email Invalid field
First, it’s important for you to understand that in Marketo when an email is flagged as invalid, the value will not automatically update from True to False if the email is manually corrected in Marketo, or when a Customer Service or Sales Representative corrects the value on the record in Salesforce and is synced back to Marketo. For this reason, I recommend that you set up a trigger campaign that listens for this scenario. In the smart list, make sure you only include leads that are currently email invalid, so not all leads run through unnecessarily, and make sure you have a filter for email address isn’t empty, so a record that has their email cleared is not marked as valid. Example below.
Smart List:

Flow:

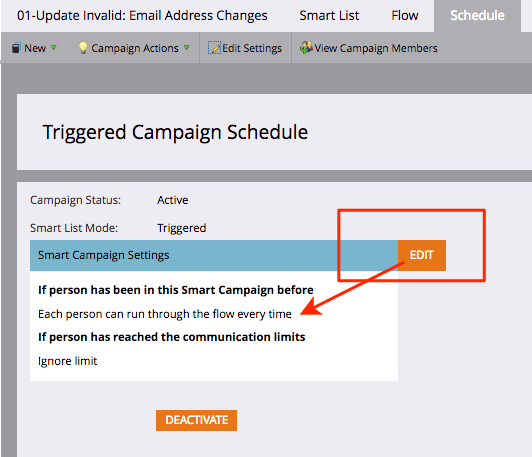
Your flow will update the Email Invalid to False, and update the cause. You’ll want to make sure you adjust the qualification rules in the schedule section of the smart campaign to make sure that leads can flow through every time.

Next, set up a smart campaign that listens for hard bounce codes with a constraint on details that contains bounce reasons you often come across when evaluating email deliverability. You’ll want to make sure that you have a filter for Email Invalid = False, see below example.
Smart List:

Flow:

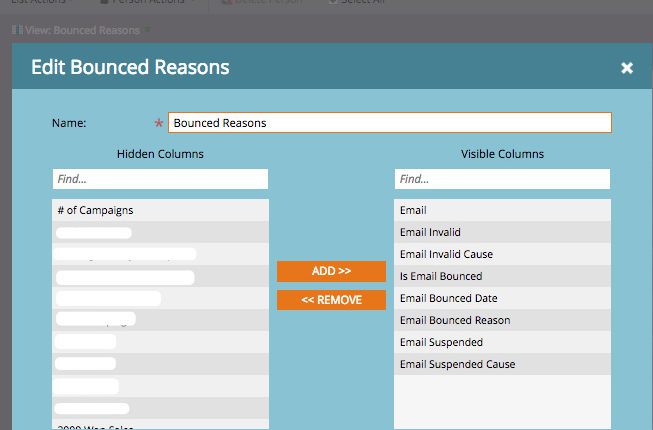
It’s best practice to keep a pulse on these monthly, so I recommend creating smart lists and creating a new custom view with the fields identified in the screenshot below. This will allow you to see who is bouncing and what common bounce codes and reasons you are seeing. Then you can update your listening smart campaign to make sure you are capturing all scenarios that are unique to your hard bounce deliverability criteria.

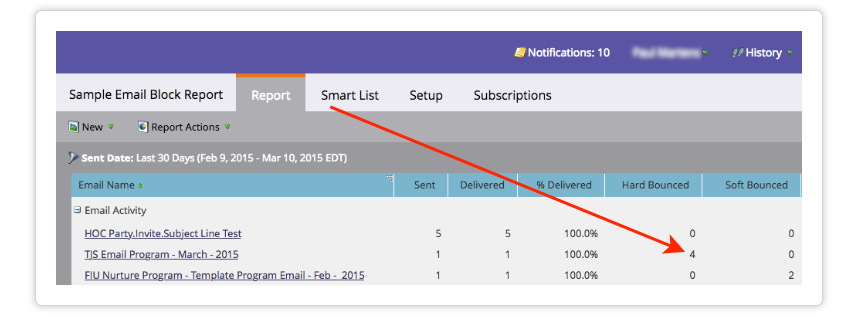
Lastly, I would recommend building an email activity report that allows you to see what types of emails are getting the most Hard bounces. Under the Setup tab, in the date field configure it for emails sent “This Year” Then under Program Selection, check the “Default” check-box. Your result would give you something like the example below and you’ll can then identify the email programs to further analyze.

And there you have it – a few solid pointers to help keep you manage bad emails using the Email Invalid field in Marketo and help keep spam scores down. Happy marketing!


