We’re pretty obsessed with putting UTMs on f*cking everything. But what happens when you have inbound traffic from links you can’t control? Here’s how we re-write parameters on the fly, in this case for SalesLoft emails (because no Sales rep or BDR is going to use the UTM spreadsheet).
>> Related: How to Implement a Marketing Attribution Model <<
Attribute Traffic from SalesLoft
We recently worked with a client who wanted to attribute any/all traffic coming from SalesLoft in Google Analytics. Thankfully SalesLoft always appends a sbrc parameter to links in SalesLoft emails when Live Website Tracking is enabled for the domain of the destination URL. So,
- In Google Tag Manager, I created a custom variable to check if the parameter
sbrcis present in the query string. - If so, before we send our hit to Google Analytics, we’re going to set or override some UTM parameters before hitting Google Analytics servers. In essence, we’re saying, “I know this visit is from SalesLoft, therefore modify the
utm_mediumandutm_sourcetoemailandsalesloft, respectively.” - Voila! As far as Google Analytics is concerned, that’s the actual URL that somebody hits.
IMPORTANT: for this to work, you must deploy Google Analytics through Google Tag Manager.
Step-by-Step
- Create a new custom variable called
sbrc. For the variable type, selectURL. Under Component Type, chooseQuery. For Query Key, typesbrc. This will set the variable equal to the value of thesbrcquery string parameter. - Create another custom variable called
utm_mediumusing the same values as above, except this time, set Query Key =utm_medium. - Repeat the previous step for
utm_source,utm_campaign,utm_term, andutm_content. - Next, we’ll create a new custom variable of type Custom Javascript called
utm_medium Modified. Copy and paste the following:function(){ var medium = {{utm_medium}}; if ({{sbrc}}) { medium = "email"; } return medium; }This code checks to see if the custom variable
sbrcthat we defined in Step 1 has a value. If so, it sets the value ofutm_medium Modifiedequal to “email” (because we know this traffic is from SalesLoft), otherwise, the value will be equal to the originalutm_mediumvalue. Most likely, this is probablynull, but we would override any value that may have been set. - Create another Custom Javascript variable called
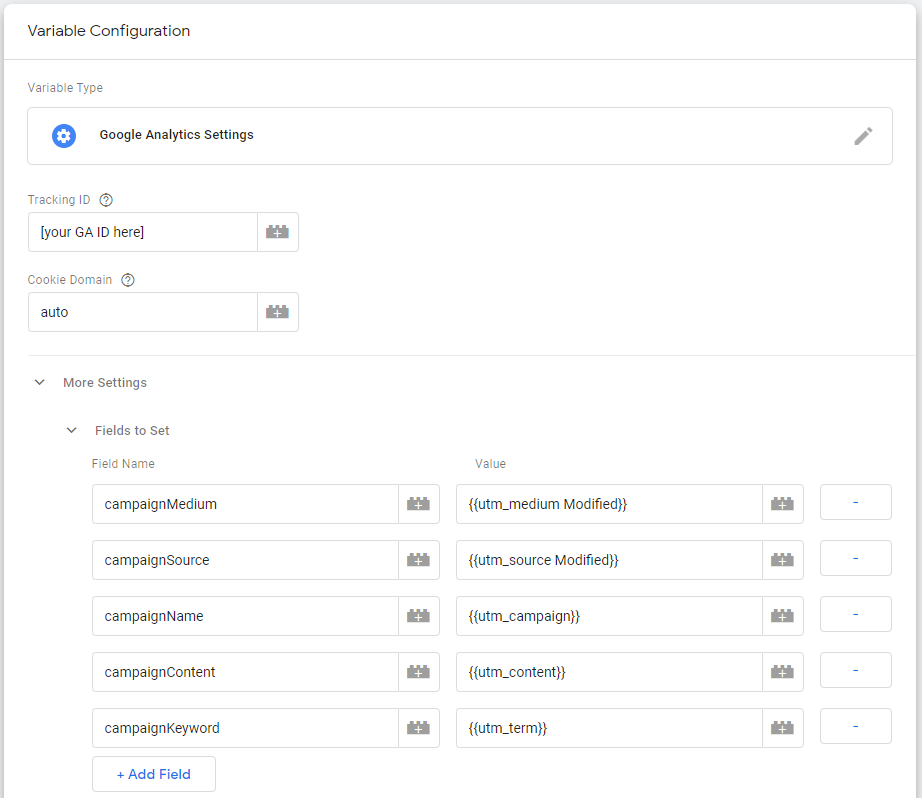
utm_source Modifiedand copy and paste the following code:function(){ var source = {{utm_source}}; if ({{sbrc}}) { source = "salesloft"; } return source; } - In your Google Analytics tag, select your Google Analytics Settings variable, and add the following Fields to Set:
 Here, we’re setting the values for
 campaignMedium,campaignSource,campaignName,campaignContent, andcampaignKeywordequal to our custom variablesutm_medium Modified,utm_source Modified,utm_campaign,utm_content, andutm_term, respectively. - Save and publish your Google Tag Manager version, and start seeing SalesLoft traffic categorized appropriately in Analytics!
Notes:
- You must add subdomains as separate domains when configuring your Live Website Tracking in SalesLoft as they treat
example.comandwww.example.comas separate domains. Make sure you add any and all subdomains you want tracked to this list. - This will only apply to traffic going forward and will NOT update historical traffic retroactively.