Letting marketing managers casually upload lists baffles me. Importing ill-formatted data from a random spreadsheet is a recipe for incorrect lead scores and assignments. If you want qualified leads worked quickly, you have to match data to the existing fields, formats, and picklists in your MAP and CRM. Here’s how I templatize and QA a list import.
>> Related: How to Test and QA an Email <<
In this post:
Use a damn template!
Do you upload Job Title or Job Type? Company Name or Account Name? Lead Source or Lead Source Detail? Don’t wing it! If you only take one thing from the post, it’s this: create and religiously use a list import template.
1. Liaise with Sales Ops to capture the exact fields you need
First, meet with Sales Ops and document the fields, picklist values, and formats that power your scoring, sales territories, attribution reports, nurture streams, email tokens, and database health.
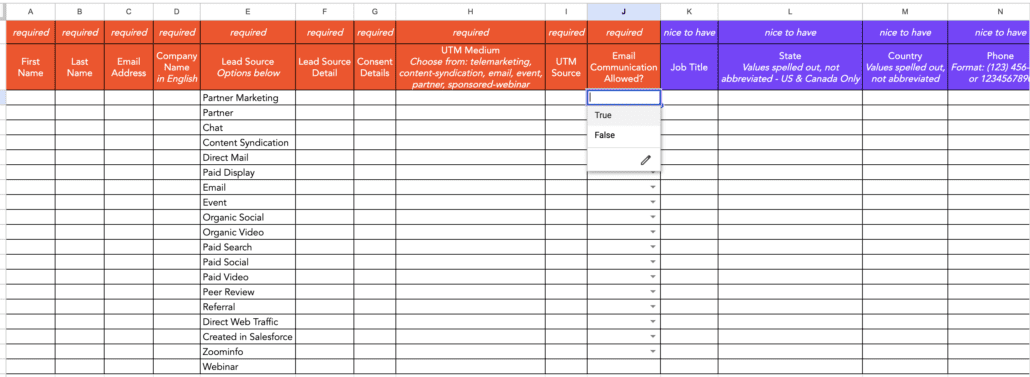
In this sample, the org has to capture GDPR consent, UTMs, and Lead Source Detail.
Click to expand
2. Explainer tabs, tooltips, and data-validation rules are your friends
The list import template sample above is explicit about what the case-sensitive(!) options are, and forces importers to use true/false instead of yes/no or 1/0.
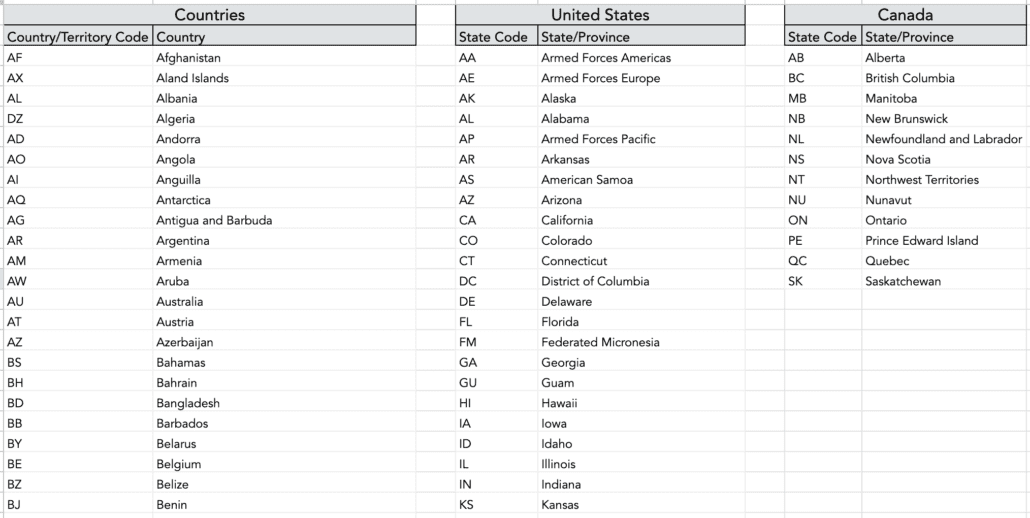
This same template has a tab that spells out how Countries, States, and Territories get populated in Salesforce. To a casual list-importer, the nuances of District of Columbia vs. Washington, DC vs DC vs D.C. will be lost. Make the template foolproof. Foolproof for even an intern you hired yesterday.
3. Replace workflow steps with columns
Chances are your marketing automation does a bunch of things during an import:
- Capturing UTMs
- Setting Lead Source and Lead Source Detail
- Setting campaign status (like “attended”)
- Capturing consent preferences
- Manually assigning or scoring leads
Instead of running a big list through all those processes, simply add them as columns. It speeds up the import and reduces the processing load.
4. Create video tutorials
Most non-admins simply won’t read or reference 30-pages of screenshots and size 10 font. Instead, create a series of 2-minute video tutorials (and hyperlink them in the template for extra credit):
- How do they use the list import template?
- How do they de-dupe? Which is the “winning” status?
- Why is data normalization important?
- Which columns require specific values or formats?
We use Screencastify for these. Taking 30-minutes to film and organize video tutorials saves hours of training with campaign marketers.
5. Embrace QA-before-import
If you have lots of casual list-importers, consider forcing them to first review their cleaned list with your admin. I promise spending 5 minutes reviewing the columns and demanding missing requirements is faster than cleaning up errors after import.
At the very least, create a list import QA checklist that checks:
- Required fields are populated
- Columns are in the correct format (this is especially important for phone)
- Data matches the picklist values
- Emails don’t contain spaces
- The list is deduped
Hot tips for uploading lists
Budget 60 uninterrupted minutes
Just like email QA, assuming an upload takes 3 minutes = mistakes. Give yourself a realistic amount of time to do the job thoroughly. Similarly:
- uploading in a panic = mistakes.
- and uploading at the end of a busy day = mistakes. I promise leads uploaded at 5:30pm won’t be worked any faster than if you upload them (correctly!) at 9:00am the next morning.


